The easiest typography tip for effective SEO
In a sea of SEO advice, it can be tricky to know which tips are worth trying. But you’re about to learn one little typography trick that you won’t...
Take full advantage of the new and improved HubSpot CMS experience with the CLEAN theme.
Have a question and looking for an answer? I've likely got a video for that or an article that covers it.
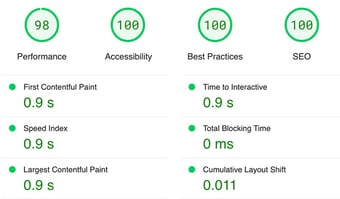
Google PageSpeed Insights is the gold standard in analyzing the speed and performance of a website. Here is how CLEAN Pro ranks. Not too shabby for a media-rich page.

Report generated: Tues, March 7, 2023, based on Home Page - Opt 1.

Earlier this year, the wizards over at Google announced that they are now supporting FAQ and How-To structured data on Google Search and Google Assistant. That sounds pretty techie, right? Let me explain and show you how the SEO Jedi, Neil Patel, is leveraging this...

In the example above, the website, description, and a few questions appear as one large block. This is giving priority weight to this page in search results. At the same time, it visually communicates greater authority and potential relevance to your search all equalling a higher chance someone will click through to your magnificent page.
Before we start, there are a few key things to know so that all your hard work doesn't get rejected.
Now that we've got that out of the way, let's jump into the 3 steps.
In HubSpot, create a new page or edit one of your existing pages where adding an FAQ section would make sense to someone visiting. Typically, this will be awesome for any of your pillar pages.
The FAQ content can be displayed in a variety of ways. Here are two that I recommend:
Using the CLEAN 6 - Row - Multi-Column Content module will make your life super easy setting this up. Simply drag the custom module into your page.

Next, click on the module to bring up its customization options. For this example we'll use two columns. One for the question and one for the answer. From the drop down, select two columns.

Now, let's select a column arrangement. I'd suggest the 5 | 7 arrangement so that the answer text has more space. 4 | 8 could work well too. I'll leave that up to you.

All you have to do now is drop in your Q & A content so that it looks something like this.

Then just repeat the process for all the Q&A's that you have for the page. Simple, right?
Everyone loves a good accordion. You know, the questions that when you click there's text underneath that expands. Using these are great for when you already have a lot of content on the page and you don't want to add even more and run the risk of "visitor content overwhelm."
Using the CLEAN 6 - Row - Multi-Column Accordion will work perfectly for you. Just like in the illustrated example above, you can easily drag-n-drop this module right into your page and select how many FAQ columns you'd like to show.
I'll spare you the image examples as they are basically the same as what's above.
After you've selected the number of columns you want to show, all you need to do is click Add one.

This will give you the ability to drop in a title (the question) and some content (the answer).

Rinse and repeat this process as many times as you like to build out as many Q&A accordions as you'd like to have on the page.
Before you freak out and think "Wait, wait, wait Kevin! I have to code something?!?!" I've got good news for you that is going to make this part SUPER easy.
The first thing you're going to want to do is pull your FAQ content into a document where its going to be easy to copy and paste from. If this is an existing web page, that's totally cool too.
Next, jump on over to this free Schema Markup Generator which makes this part much easier.
At the top you'll see a drop down that asks what type of markup you'd like to create.
Select FAQ Page from the drop down.
Then start copy/pasting in your Q&A's

Notice the little code that's being generated on the right hand side. That's the magic sauce that we need for this to all work.
Once you've got all your questions and answer added in, click the little blue copy icon and you're ready to move to step 3.
Now that you have the code snippet copied to your clipboard, the third and final step will be a breeze. Head on back to the web page you added your FAQs too and click the Settings tab at the top.

Scroll down a bit and toggle down the Advanced Options. This will give you access to paste the code snippet you copied into the <head> of the page.
Just like this.

That's it! If you're ready to publish or update your web page, you're free to do so.
All you have to do now is sit back and let the Google SEO spiders do their thing.
If you got some value from this tutorial or have any questions, I'd love for you to drop me a comment below.

In a sea of SEO advice, it can be tricky to know which tips are worth trying. But you’re about to learn one little typography trick that you won’t...
.jpg)
HubSpot’s Smart Content is a handy feature for customizing your website visitor’s experience. You can set up rules to display different content for...

The last few years at HubSpot’s annual INBOUND conference have been “all about AI.” This year? Inbound 2025 was less hype and more real-life...