The insanely easy way to get immediate HubSpot reports
Ready to start reporting in HubSpot? There's a lot to break down on this topic so before we dive in deep, let’s quickly walk through some basics and...


This step-by-step visual guide will walk you through the process and help get your website all set up on HubSpot.

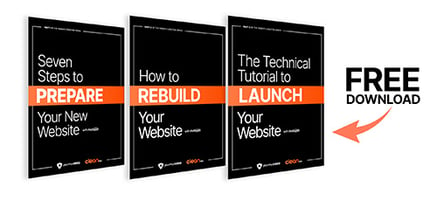
No developer is needed. This complete 3-part series includes a step-by-step guide to high-fives all around the office.

Take full advantage of the new and improved HubSpot CMS experience with the CLEAN theme.
Have a question and looking for an answer? I've likely got a video for that or an article that covers it.
Google PageSpeed Insights is the gold standard in analyzing the speed and performance of a website. Here is how CLEAN Pro ranks. Not too shabby for a media-rich page.
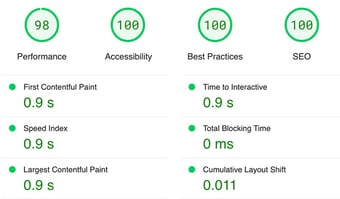
Report generated: Tues, March 7, 2023, based on Home Page - Opt 1.
4 min read
 Miriam-Rose LeDuc
:
February 9, 2021
Miriam-Rose LeDuc
:
February 9, 2021

As an inbound professional, you get how important it is to understand how your customers interact with your business. But how can you measure their journey in HubSpot? Let me walk you through 7 steps to creating a custom lifecycle flow for your unique business needs:
Let's get started.
Let's start with the fun part: naming your lifecycle stages. Think about the actions your contacts could take that will move them through their customer journey. For example:
Make sure you cover all your bases to keep any contacts from slipping through the cracks.
Once you've figured this out, you should have a general sketch of your flow. Something like Stage 1 --> Stage 2 --> Stage 3 --> Stage 4 (the number of lifecycle stages you need is totally your call).
Done defining your custom stages? Awesome. Let's move on to step 2.
Alright, so here's where you'll actually make the properties for each lifecycle stage. To do this, click on the Settings gear icon in HubSpot, and you’ll see Properties in the menu on the left.
Once you’re in Properties, hit the big orange Create property button, and you’re ready to get started.
You're going to want to select Contact as the object type, and either Contact information or Conversion information for the Group info. Label your new property anything you want, for example, Custom Lifecycle Property (creative, I know).
.png?width=800&name=2021-02-07%20(33).png)
Next, you’ll be prompted to choose a property type. I recommend using dropdown select so you can add each of the custom lifecycle stages you came up with in step 1 to the dropdown menu.
.png?width=800&name=2021-02-07%20(6).png)
Once you’re done with this, create an additional date property for each lifecycle stage. Pick your objects and group info just like you did above. When you get to the name field, try something like Became a {custom lifecycle name} date. For the property type, choose date picker. This feature will come in super handy later on in step 6.
.png?width=800&name=2021-02-07%20(34).png)
At this point, you should have one custom lifecycle property and multiple custom date stamp properties. You with me? Fantastic, let's keep moving.
Time to get organized. Using the details you laid out in step 1 as filters, start segmenting your contacts into lists. You’ll want an active, contact-based list for each lifecycle stage you plan to assign down the road.
.png?width=800&name=2021-02-07%20(12).png)
Make sure your contacts go through your flow in the right order, too. For example, in your Stage 3 list, you might want to include a filter like Became a {Stage 4} date is unknown.
.png?width=400&name=2021-02-07%20(15).png)
Got your lists? You're doing great.
Now that you’ve created your lists, it’s time to get granular. Look at several examples of contacts to make sure you're targeting the correct properties and that there's no overlap between your lists (in other words, your contacts should only be in one lifecycle stage at a time).
Remember to double-check your integrations, too. Any integrations or existing HubSpot workflows fit together as pieces of a larger puzzle, and you want the logic to flow smoothly from one to the next as your potential buyer goes through his or her journey.
Pro tip: watch out for duplicates! A contact who looks like they haven’t gone through your flow may have a clone who has. You don’t want to bombard them with information they already know by sending emails to a second email address. Do you have duplicates in your CRM? Here’s how to check:
Go to Contacts, Actions, and then Manage Duplicates. You’ll see any duplicates HubSpot has found here (if you don’t see any, you’re squeaky clean! Feel free to skip to step 5).
.png?width=400&name=2021-02-07%20(17).png)
Click review to take a look at each duplicate, and decide if you need to keep ‘em or toss ‘em. Once you merge two contacts, it can’t be undone, so make sure you know which one you want to keep.
If all this analysis is making your head spin, map it out. Miro is a fantastic tool for creating visual flowcharts, plus you can use up to three boards for free!
Take a deep breath now. You're crushing this, and we're almost there!
Remember those custom properties you made in step 2? Here’s where they finally come into play.
Head to Automation, then Workflows, and hit the orange Create Workflow button to get started.
You’ll want to start from scratch with a Contact-based workflow.
.png?width=800&name=2021-02-07%20(19).png)
For your enrollment trigger, choose one of the custom lifecycle lists you analyzed to pieces in step 4. For example, if one of your lifecycle stages is named Lifecycle Stage 1, then a contact will have to be a member of the Lifecycle Stage 1 list to be enrolled in the flow.
.png?width=800&name=2021-02-07%20(25).png)
Next, you want to give your contact a lifecycle stage. Add a step to your flow, and click Set property value. Pick your Custom Lifecycle Property, then stage 1 as the value to be set.
.png?width=800&name=2021-02-07%20(26).png)
.png?width=800&name=2021-02-07%20(27).png)
Add another action for your date stamp. This will also be a Set property value step, but then you’ll choose your Became a Lifecycle Stage 1 Date property (for example) and click Date of step.
.png?width=800&name=2021-02-07%20(28).png)
Quick tangent: the cool thing about this date stamp is that it’ll let you track the time your contacts spent between stages. To set this up, create a custom property like we did in step 2, but for property type, pick calculation. Here, you can choose Time Between for the Calculated property type. Then, choose any two lifecycle stages or look at the complete journey by comparing the contact create date to the final lifecycle stage.
.png?width=800&name=2021-02-07%20(31).png)
Alright, back to the workflows. Repeat all of step 6 to create a workflow for each lifecycle stage, but don’t turn them on yet. You've got one more step.
Check yourself before you wreck yourself: make sure your workflow targets the right people by clicking on test a contact.
.png?width=800&name=2021-02-07%20(32).png)
Also, think about whether you should include any contacts who currently meet the requirements or if it makes more sense to add only new business contacts as they qualify.
Once you’ve decided, flip that on button and watch the magic happen.
Just like that, you created a custom lifecycle flow designed for your unique customers and biz. Give yourself a pat on the back.

Ready to start reporting in HubSpot? There's a lot to break down on this topic so before we dive in deep, let’s quickly walk through some basics and...

Earlier this year, the wizards over at Google announced that they are now supporting FAQ and How-To structured data on Google Search and Google...
1 min read
Want to boost conversions on your landing pages? Try A/B testing. HubSpot makes it as easy as 1, 2, 3. Watch the video below to learn how, plus...