Save This: The Shortcut You Need
What if you could shave hours off your website build? HubSpot's saved sections help you create mini templates that you can copy from one page to...


This step-by-step visual guide will walk you through the process and help get your website all set up on HubSpot.

No developer is needed. This complete 3-part series includes a step-by-step guide to high-fives all around the office.

Take full advantage of the new and improved HubSpot CMS experience with the CLEAN theme.
Have a question and looking for an answer? I've likely got a video for that or an article that covers it.
Google PageSpeed Insights is the gold standard in analyzing the speed and performance of a website. Here is how CLEAN Pro ranks. Not too shabby for a media-rich page.
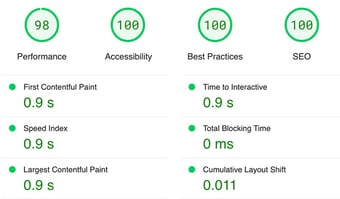
Report generated: Tues, March 7, 2023, based on Home Page - Opt 1.

Taking on a website redesign project can be both terrifying and thrilling at the same time. In this article I'm going to break down the ten key steps to organizing and redesigning your website like a true pro. Not only that but you'll save money, time and reduce any risk of your efforts going sideways.
Before we get into this, not all website redesign projects are created equal. If you fall in either of these three groups, this article will surely make you look like the superhero at your company.
You've got a small website with less than 10 pages and perhaps a blog that's remained untouched for more than a few months. There are a few parts of it you'd like to salvage but largely want to start over and breathe new life into your brand and presence online. Also, you want this done yesterday.
You're on the marketing team at your company and responsible for top of funnel growth. You feel that a website redesign is low hanging fruit to improve conversion rates and enhance brand positioning in the market. There are over 20-30 existing web pages, landing pages, a blog and various workflows that you have to consider. You want this done fast but it's more important you don't break things that are working.
You're responsible for your companies website and overseeing the redesign by working with an agency or freelancer to do the work. You've got a bunch on your plate and need this project to go as smooth and quick as possible.
Jump to:
This simple and often skipped over step is one of the biggest time savers in the long run. It doesn't matter if your website is 10 or 1000 pages. Creating an inventory document as your first step will help you and anyone else involved in the project get organized with lightening speed.
Whip open a new Google Spreadsheet or use my template and start listing out the pages that make up your current website, blog and landing pages.
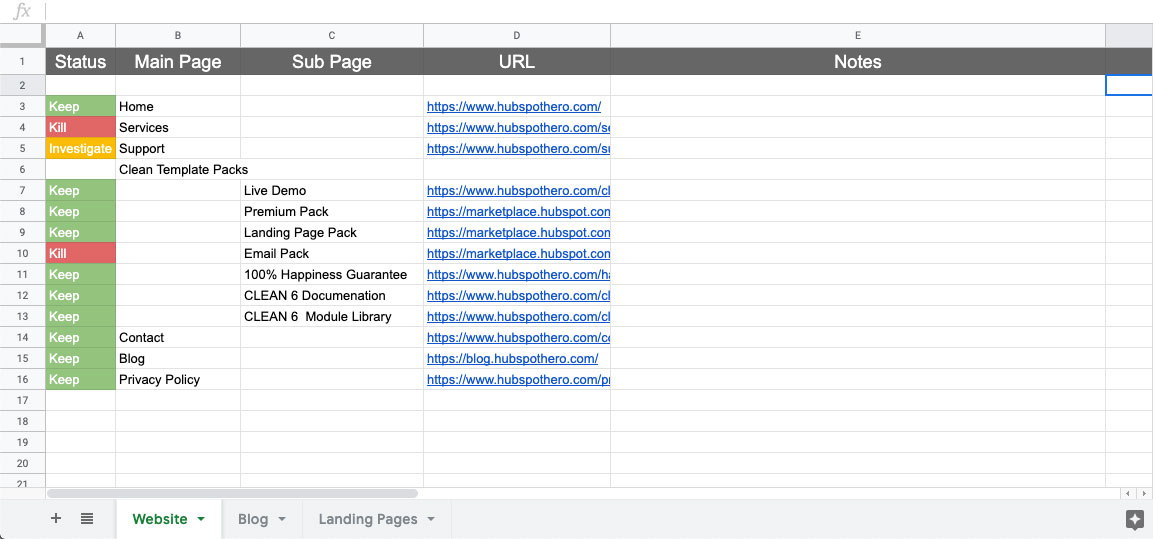
Feel free to add additional columns but I highly encourage you to keep this document simple and as easy to digest as possible.
After you've compiled the list and structure of your existing pages, I recommend filling in a status for each (column A).
Do you plan to:
Keeping track of each page's URL serves two purposes.
You've got your inventory sheet ready to rock. Let's move on...
In a majority of cases, your site structure may not change greatly from the current version. Since you've already done the work creating your inventory spreadsheet, you can use that to jumpstart this step.
Make a copy of your inventory sheet so the original is left intact.
First things first... Delete any of the rows where you've decided to kill a page. Then highlight everything in the Status column and delete it. At this point these pages are all "keepers," so we can utilize this column for a different type of status such as:
This effectively turns your sitemap into a living document that will give you, your team, or stakeholders a high-level overview of where you're at in the redesign process.
Next, add in any new pages you plan on creating or reorganizing existing pages. Think of the "Main Page" column as your top-level navigation. It's important to keep this as concise as possible to reduce the cognitive load someone has when visiting the page. That's a fancy way of saying that you don't want to overload someone's brain with too many choices when they land on your website.
Either before or after (doesn't really matter) you have your new site structure all laid out, add a new column to your sheet titled "Page Content" right after the Notes column.

In this column you'll be adding links to individual Google Docs where the content for each page will be written and organized.
What a smooth transition to step 3...
For each page of your website create a new Google Doc where you can copy and paste over existing content, edit it or write new content from scratch.
It's important to use a separate text editor vs. simply adding a reference link to the webpage that's going to be replaced. This way you can remove any design bias as it relates to the content when creating the redesigned pages.
At the very top of the page add a small content table that will help set the stage for the content below and looks like this.
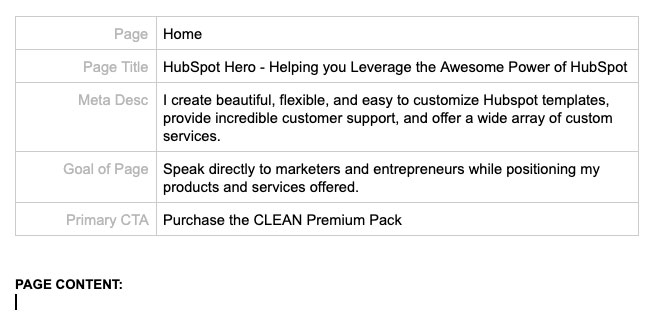
This will help you quickly stub out content documents for each page with high-level details to inform the content you'll write or edit below.
When you're ready to start writing content, you'll have a document ready and waiting for your magical copywriting skills.
The opportunity to redesign your website doesn't come around all that often. When it does, it's a great time to take notice of modern web design trends, how your competitors are positioning themselves in the market, as well as other websites that inspire you.
Some people call this a mood board, brand board, design inspiration board, etc. It doesn't really matter what you call it so long as you spend an hour or two pulling together different pieces to help inform some of the design decisions that will go into this project.
The best, first place to start is with your company's brand style guide. If you don't have a style guide, no problem-o. Simply adding your company logo, brand colors and fonts (if you plan on keeping them) you use will definitely do the trick.
This will be ESPECIALLY helpful if you're working with an outside agency or freelancer, so that you're on the same page.
There are a ton of different online tools to help you create a design reference board. One of my favorites to use is from InvisionApp.

However, there are a ton of cool alternative products that you can use to do this. Here are a few other notable ones you might want to have a look at:
When you start creating your board, go nuts! Any design reference that you feel speaks to your target audience and aligns with your brand goes on the board without a second thought.
As you start to add more and more to the board, you'll begin to see some patterns emerge.
Are you gravitating towards a flat, simple design?
Do you lean towards illustrations instead of photography?
Narrow in on a theme and then begin to remove the items you added to the board which don't seem to align. The hour or two you spent on this process should result in a cohesive design theme that you can point to and say...

With your page content loosely organized and a design board to reference, it's now time to start gathering some initial creative assets.
This might include:
The point of this step IS NOT to gather every single photo, icon, video, etc. that you will need before starting the next step. Finding creative assets that work well to strengthen your copy will be an ongoing part of the redesign process.
Having a small asset library to start off with will help kick-start the next step when redesigning the first few pages. Not to mention, it's going to help you create an organized folder structure for these assets.
The folder structure I set up for every single project looks like this.

Here is how I use each of the folders.
Use this as your base folder structure and then add to it as you see fit. If you are redesigning a large website, I'd encourage you to add sub-folders to each of these. However, do you best to avoid the trap of having too many nested folders. This can lead to more confusion and time wasted in the long run.
By now you might be thinking... This is all great, but where am I going to get all these creative assets?? I'm not a designer.
Don't worry, I've got you covered. Here are a few great resources for you to check out.

At this point you're likely itching to start redesigning each of the web pages. Before you do, there is one simple, yet crucial, step that will ensure you have design continuity throughout your new website.
The headline gave it away, I know... The website style guide.
If you have a brand style guide, this will be very similar but help you define the global style for your website.
Primarily this will include but not limited to:
As an example, this style guide template is included in my CLEAN template series for HubSpot.
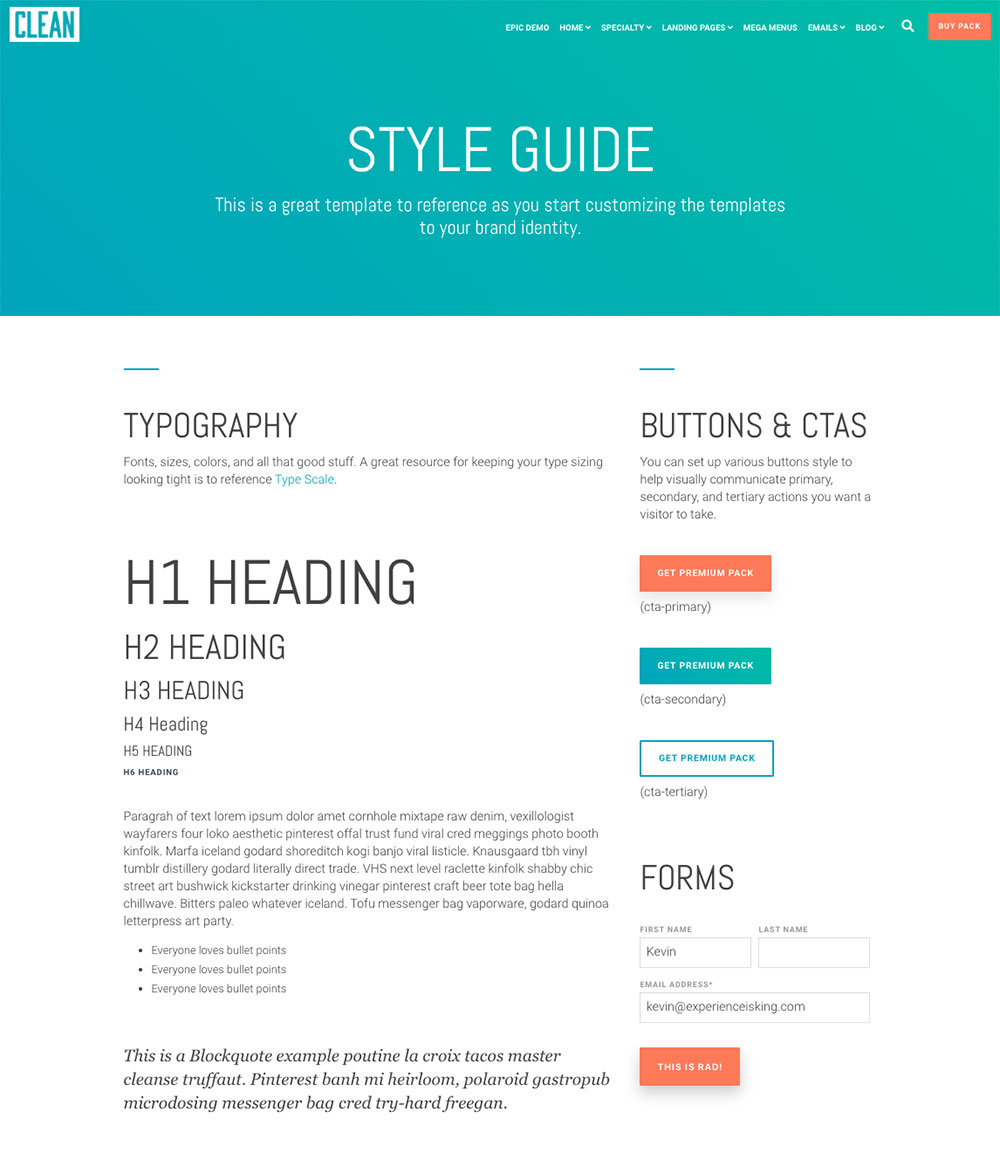
This will show you how all your core design elements will work together in sweet, sweet harmony.
The home page of your website has a large responsibility. It often creates the first impression someone has with your brand, product or service. It needs to speak to your target audience and clearly convey what it is you're offering and why that should matter.
It's beneficial to start here because your home page will likely continue to evolve throughout the process of redesigning the entire website.
There is a lot of debate on what makes an awesome home page. Yet, it all boils down to one simple thing...
An awesome home page is one that captures a visitor's interest so much that they want to take the primary action presented to them.
Achieving this is easy when you focus on these two areas:
Creating or revising existing content can be a bit of a beast which is why I like to break it down to four parts to make sure all bases are covered.
Every single page of your website should prompt a visitor to take some type of action. This absolutely goes for your home page too. Obviously...
Focusing on a primary and secondary (optional) action that you'd like a visitor to take is going to help you create a MUCH better experience AND increase the conversion rate on your home page.

With your content and desired actions in order you'll be in prime shape to hammer out an awesome first version of your newly redesigned home page.
Following the Growth Driven Design model, it's important to prioritize all of additional pages that will make up your website. This is especially important if you have a very large website that you're redesigning.
I'm a sucker for simplicity and suggest grouping all pages into three tiers.
By taking 15-30 mins to go through this prioritization process, you will develop a clear plan of attack for which pages should be focused on and in which order. This way, should you come up against your deadline to launch, you can easily decide that you're going to complete all pages in a certain tier, then release your redesigned site.
Of course, then keep working on the remaining tiers. :)
You've got all your redesigned pages looking great and ready to rock. Now it's time to do a pre-launch check and select the day of the week you're going to launch your new site.
At this point, the site map spreadsheet you created in step 2 should be lit up with the color green with approval and buy-in from any stakeholders that you're working with.
Now it's time to do a final sweep and test the following:
If you are the one in charge of the website redesign, I encourage you to get a second or third pair of eyes. Ideally someone on your team who hasn't been involved in this redesign project.
You've just put in weeks if not months of hard work redesigning your site and chances are, you're pretty freakin' excited. I definitely would be too. Now is no time to get hasty even if you've gone through your pre-launch check and feel good to go.
There is one simple rule that any experienced developer or web designer will tell you when it comes to launching a website.
Never launch on Friday!
This isn't necessarily a hard-n-fast rule. However, if you and your team don't typically work on the weekends, then you'll want to follow this simple rule. After all, no one wants an email, or worse A CALL, saying the website isn't working while four bottomless mimosas in during brunch.

Instead, you'll want to select a day between Monday and Thursday. This way, you'll be in the office the next day should you happen to have to put out any fires. Fingers crossed that won't be an issue. But it's best to be on the safe side. You know, for the sake of the mimosas and farm to table bacon you just gobbled down. :)
Check your web traffic analytics platform.
If you have a large amount of traffic visiting your website regularly, a great starting point is to open up your analytics panel. You'll want to set a date range to look at the past 90 days. Are there trending days (Mon - Thurs) that have lower pages views that others?
Find a day with the lowest volume of traffic and make that your launch day.
Launch and then give your team a big high-five.
The single best way to know which immediate improvements need to be made to your newly launched website is by watching others use it.
The good news is that you won't need to roll your chair up behind someone in the office and awkwardly peer over their shoulder while they point and click around.
Instead, you want to see how real visitors to your website are interacting with it when they have actual intent to learn something, sign-up, or purchase your product.

I love this tool. I use it myself and it never fails to teach me a ton. Hotjar, if you're not familiar, is a tool that will allow you to visually understand how people are interacting with your website. You can set up click heat maps, visitor recordings along with many other things.
The best part is that they have a free account that will allow you to try out some of the features and start learning instantly. The install is easy too. All you'll need to do is copy/paste the embed code they give you into the <head> of your website or use one of their plugins/apps depending on what platform your website is on.

UserTesting gives you the ability to send specific types of people to your website with tasks to do. You're able to create a script with questions that the visitor will answer out-loud. The screen and audio is recorded of each tester so that you can watch it back.
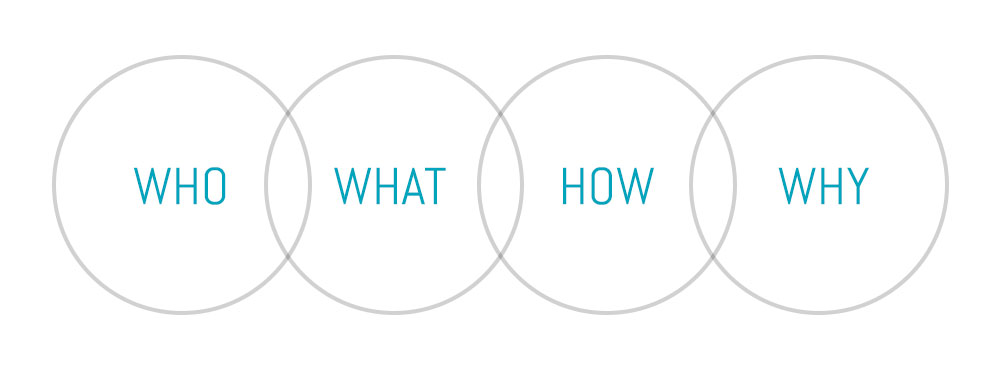
This can lead to incredible insights about your content and if it's hitting the mark when it comes to communicating the Who, What, How, Why.
* I'm not affiliated with either of these companies. Just used them a bunch.
Building a beautiful, on-brand website that provides an awesome experience and converts visitors into leads, then into customers, is an ongoing process.
It takes time.
It takes knowing your audience.
It takes constant iteration.
To that point, consider your website never "done." Now that you know how to redesign your website, you'll want to keep optimizing and refining it to reap the benefits of growth.
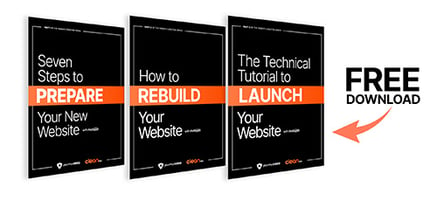
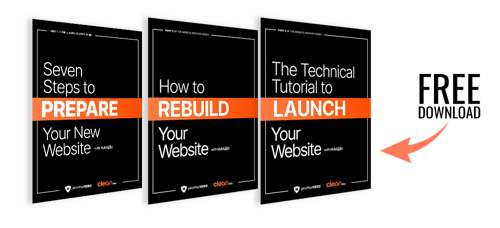
And if you're redesigning with the HubSpot CMS, use this free guide as you're working on your company's website. You can send me a high-five GIF later.

What if you could shave hours off your website build? HubSpot's saved sections help you create mini templates that you can copy from one page to...

2022 is around the corner, and what better way to ring in the new year than with a fresh CLEAN feature? Today you’ll learn how the new timeline...

To all my fellow designers out there, this one is for you. Today, I'm excited to announce the release of version 1.0 of the CLEAN Pro Figma file....